

How To Set Up A Tracphone
If you lot are a user of Tracfone and are experiencing difficulties with the Mobile network or net connectivity of the service we are here to help you. You must most probably be facing these issues because you lot have not reconfigured the Tracfone APN settings correctly in club to have a data connection. In this article, we will give you the step past step instruction on how to manually change the APN settings on your Smartphone for information technology to avail Data connectedness and MMS through the carrier Tracfone.
Meet also: Cricket Wireless APN Settings | Step by Step Guide
Contents
- 1 Working of Tracfone APN
- 2 Tracfone APN Settings for Android
- 2.1 How to Configure APN settings for Android
- 3 Tracfone APN Settings for iPhone
- 3.1 How to configure APN settings on iPhone
- 4 Tracfone APN Settings for Windows phone [Internet APN and MMS APN]
- 4.ane How to Configure APN settings on Windows phones
- 5 Tracfone APN settings for Blackberry
- 5.ane How to configure APN settings on Blackberry Phones
- 6 Final Words
Working of Tracfone APN
An APN or Access point proper noun is a set of necessary data that connects your phone to your service provider. To accept a working information connection, you must have a correctly activated APN settings.
Your Mobile service provider can read these settings from your mobile phone and then they tin make sure that your IP address is precisely adamant and you are connected to the correct secure gateway.
Through this gateway, your phone will exist connected to the internet. Nigh probably your smartphone would automatically download these APN settings from your network carrier. But in case it did not happen, you would have to enter these settings manually.
You lot must make sure to blazon in the settings carefully, to not miss out whatsoever letter of the alphabet or character because an incorrectly entered APN settings can crusade you to lose data connection and Multimedia Message Services.
Once you accept made a note of these Tracfone APN settings, you may proceed to reconfigure the settings. You must make sure that you accept purchased the correct information plan that your phone is compatible with, in gild to reconfigure your APN settings.
The following are the steps to reconfigure the settings on Android, iOS, Windows Phone and Blackberry phones.
Encounter likewise: AT&T APN Settings | Stride by Step Guide
Tracfone APN Settings for Android
- APN Name: Tracfone
- APN: Reseller
- Proxy: Keep this blank
- Port: 80
- Username: Keep this bare
- Password: Keep this blank
- Server: Keep this blank
- MMSC: Keep this blank
- MMS Proxy: Keep this blank
- MMS Port: Go along this blank
- MCC: 310
- MNC: 410
- Authentication Blazon: PAP
- APN Blazon: default
- Protocol: Keep this blank
- APN Roaming Protocol: Go along this bare
- Bearer: Keep this blank
- MVNO Blazon: Go along this bare

How to Configure APN settings for Android
- Open up Settings
- Yous must click on More from the Settings list
- Select Mobile networks under More than
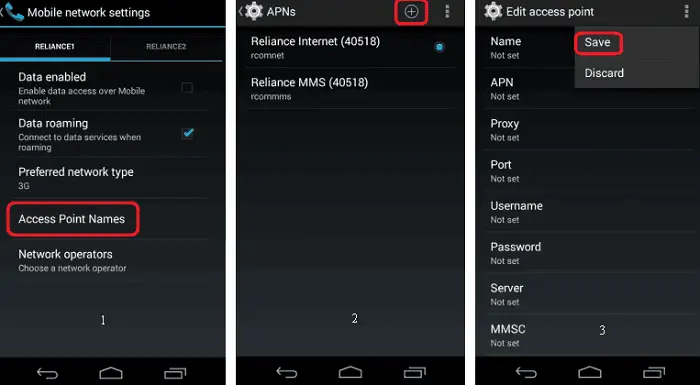
- You can proceed to the Access Point Names option under Mobile networks and blazon in the Tracfone APN settings from the data that we take given beneath
- Finally, you must reboot your phone and try out your new settings
Come across also: Telcel America APN Settings | Step by Step Guide
Tracfone APN Settings for iPhone
- APN Proper name: Tracfone
- APN: Reseller
- Proxy: Keep this blank
- Port: 80
- Username: Keep this blank
- Password: Keep this blank
- Server: Go on this bare
- MMSC: Keep this bare
- MMS Proxy: Continue this blank
- MMS Port: Keep this blank
- MCC: 310
- MNC: 410
- Authentication Type: PAP
- APN Type: default
- Protocol: Go along this blank
- APN Roaming Protocol: Proceed this blank
- Bearer: Go on this blank
- MVNO Type: Proceed this blank

How to configure APN settings on iPhone
- Open the Setup section of your iOS device, which could exist an iPhone or tablet
- Select General under the Setup
- Tap on Network in the General department of your device
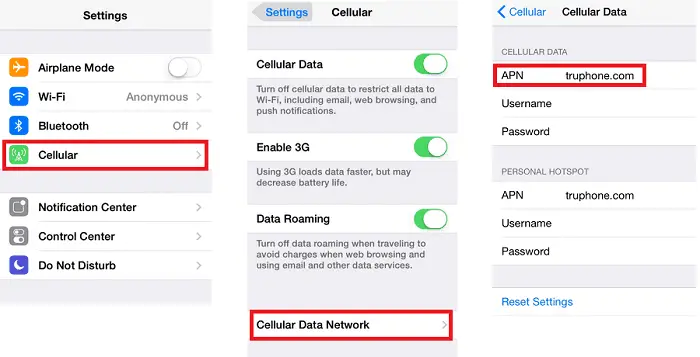
- You must select the Mobile Data option nether Network and type in to fill up the boxes with the above mentioned Tracfone APN settings
- Finally, you must save your changes, go out the options, and reboot your device
Likewise run into:
- Sprint APN Settings | Step past Step Guide
- LycaMobile APN Settings | Stride by Step Guide
- Verizon APN Settings | Step by Step Guide
- H2o Wireless APN Settings | A Step past Stride Guide
Tracfone APN Settings for Windows phone [Net APN and MMS APN]
- APN Name: Tracfone
- APN: Reseller
- Proxy: Proceed this bare
- Port: 80
- Username: Proceed this bare
- Password: Keep this blank
- Server: Keep this blank
- MMSC: Keep this bare
- MMS Proxy: Proceed this blank
- MMS Port: Keep this blank
- MCC: 310
- MNC: 410
- Authentication Type: PAP
- APN Type: default
- Protocol: Keep this blank
- APN Roaming Protocol: Keep this blank
- Bearer: Go along this blank
- MVNO Type: Keep this blank

How to Configure APN settings on Windows phones
- First, you must check if your telephone is accepting the Tracfone SIM. If information technology is not, you will want to call the closest Tracfone service provider
- Proceed to your applications section and select Settings
- Then choose the option Cellular + SIM under Settings
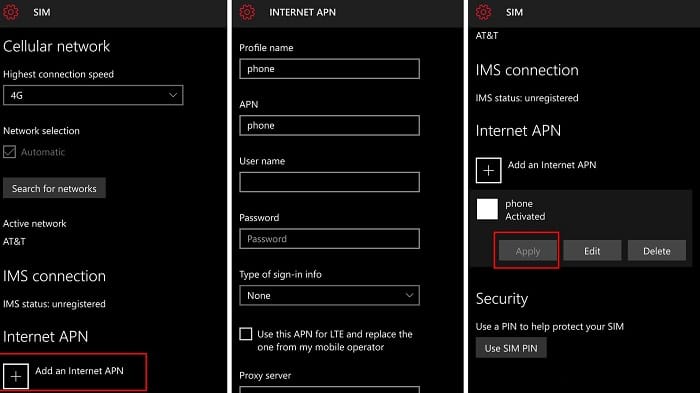
- Now, move to SIM settings from the Cellular + SIM pick and then tap the option, add together Internet APN
- Adjacent, you should type in the values given below in the settings
- Salvage the changes you have made and go out the settings. Finally, you must reboot your device
Meet also: Freedompop APN Settings | Pace by Step Guide
Tracfone APN settings for Blackberry
Internet APN:
- Admission Point Proper noun: att.mnvo
- Username: Leave blank
- Countersign: Get out bare

MMS APN:
- APN: att.mnvo
- MMSC URL: http://mmsc.cingular.com
- Proxy URL: proxy.mvno.tracfone.com:80
How to configure APN settings on Blackberry Phones
- You lot must select the Settings icon of your Blackberry phone
- Nether Settings, open Network Connections
- Go on to choose the section named Mobile Network nether Network Connections
- Select APN, which y'all will see at the very bottom of the screen. Type in the internet APN settings
- You must save these changes and go to the chief menu
- You must select Text Messages and tap on the dots
- Select Settings and choose Text Messages
- Under MMS and Avant-garde, you should type in the MMS APN settings
- Finally, you must save the changes, exit the options and reboot your device to endeavor out the Tracfone service
Come across besides: Consumer Cellular APN Settings | Step past Step Guide
Final Words
These are the steps to blazon in your new APN settings in different devices manually. Regardless of the device, once you've typed in the APN settings, saved them, and restarted your device, yous tin get ahead and enjoy your Tracfone mobile internet service.
You volition also be pleased to know that the Tracfone network services are very affordable, and fifty-fifty the nigh user-friendly and least expensive option for users that brand below an boilerplate frequency of calls, and although it does not allow for international messaging, information technology generously provides for relatively cheaper international calling.
And then we hope that our instructions and pace by footstep guide to manually set up your Tracfone APN settings helped you lot to solve the problem yous are facing with your mobile internet connection or multimedia messaging service.
Also Refer: Family Mobile APN Settings | A Stride by Step Guide
Source: https://www.techwhoop.com/tracfone-apn-settings/
0 Response to "How To Set Up A Tracphone"
Post a Comment